Behind the Scenes of a Custom Drapery Workroom
You've just redecorated a room; you've got floor coverings, furniture and accessories in place. What's next? The right window treatments to bring continuity to the room. They coordinate the textures and colors from the floor and furnishings to the walls. The right window treatments can finish a room the same way the right accessory or shade of lipstick complete an outfit or look.
You choose beautiful custom window treatments that frame and enhance your windows. They provide privacy or light control when needed and this is now your favorite room in the house.
The scene mentioned above doesn't happen overnight or come from a big box store. Similar to June's blog about slipcovers, this month I'll be sharing the benefits of custom window treatments and behind the scenes look of how they are made.
Custom Window Treatments vs. Retail:
What's the Difference?
We all know in clothing that one size does NOT fit all! The same is true for window treatments from a big box store. The standard sizes are 54” wide by 84” or 120” long. If your window is wide or tall (or short) the chances those packaged panels are going to look right are slim. And if you have more than one window in a room? The pattern on big box window treatments are rarely in the same place from package to package and the flowers, stripes, or shapes won't be aligned. Custom window treatments are made for YOUR windows. Many clients have told me that they wish they'd contacted me sooner for custom window treatments as what they had bought "off the shelf" just didn't look right.
I'm often asked why custom window treatments are expensive. While there are many variables that affect the cost such as fabric and hardware, time is the key factor. It takes time to get size, proportion and proper pattern placement right. Correct proportions and pattern placement are not happy coincidences.
I put much time and consideration in each window treatment order. In fact, the “easy” part is often the fabrication. On almost every order I will spend time planning where and how the treatments will be installed and draw renderings to scale to be sure everything will look just right. Hours may be spent deciding where motifs (patterns) will go on a window treatment before I take scissors to fabric. Centering flowers or birds, balancing stripes, or pinning in pleats to see how a panel will look are a part of this process. One client preferred birds to butterflies in a pattern so I made sure to highlight the former in her valances. These details make gorgeous custom pieces and account for the difference in price but are well worth the long-term investment in quality and longevity .Don't spend money to save money. Spend wisely.
How Custom Window Treatments are Made
Step 1. Window Treatment Consultation
No matter if I’m working with a designer or directly with a homeowner, the first step is often a phone call. I like to talk to people to learn about their needs, space, and what they have in mind.
When I work with a designer, the initial consultation has usually been done. I may be called to take measurements, or discuss how the window treatments will be used, where they will be installed, and go over the fabric choices and lining needs. Sometimes the designer has sent me a sketch of an idea and is calling to consult with me on on the best way to carry it out.
With a homeowner, we’ll talk about their space, their needs, and what styles or colors they have in mind. I’ll then know what fabric samples to bring and design ideas to show them.
Measurements are taken of the windows and the space around them.
I draw the designs to scale to be sure of the proportions.
The client is presented with detailed sketches with samples of fabric and trims.
Step 2. The Raw Goods
The next step is waiting for all the materials to arrive: fabrics, trims, and hardware. If the items are in stock, they may arrive quickly. If not in stock, custom hardware for example, it may take several weeks to deliver. Silks from India or linens from Europe may take longer as well. I don't promise a delivery date until I have all necessary items in house.
Step 3. Quality Inspection
As items for an order arrive, I inspect all of the packages. For fabrics and trims, I check the yardage, pattern and color. For trims, I look for splices. If there is a splice, I mark it and plan my cuts around it. I check through all of the hardware and make sure it is the correct finish, the rod is the right length, and there are enough brackets and rings or carriers. If something is missing or is wrong, I quickly work on correcting it.
When a delivery arrives, I check it in to match it up with an order. Lexie helps supervise.
I go through each box and make sure all the parts and pieces needed are there.
Step 4. Pattern Placement & Cuts
Careful consideration goes into pattern placement on all treatments. For Roman shades, I’ll fold the fabric as it will be in the raised position to check that the pattern looks just as good as when the shade will be lowered. I'll also look at the where the pattern falls at the top 12 inches where the shade remains flat. I use a similar method for valances, making sure the pattern is centered. On panels, I’ll not only make sure the pattern flows evenly from one panel to the next, but pin in pleats to know what the finished look will be. Pattern placement is determined before the first cut is made. Measure twice, cut once!
For fabrics with a strong pattern I will manipulate the fabric several different ways before cuts are planned and fabric is cut.
This design element is in the room where the panels were to go and was the inspiration for the tops of the panels.
This is the top of the panels, called the heading. Where and how the pleats are stitched affects the overall look of the panel.
Completed drapery panels. There were 6 lengths of fabric for this pair and each was cut carefully so the pattern flowed evenly all the way across.
Step 5. Tabling
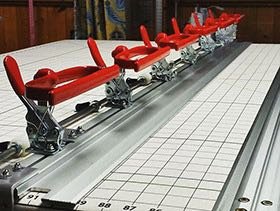
After the fabric has been cut and all pieces are labeled, I’ll get the work table ready for fabrication. A grid is laid out for the finished size Roman shades or a clamping system is attached to the table for panels. The grids are used to be sure the shades will be square and the correct size when finished. The clamping system holds the bottom of the panel in place to get the correct finished length. Both increase efficiency and save time by eliminating walking around a 5’ x 12’ table.
A clamping system that attaches to the table helps hold fabric in place to prevent shifting. Photo courtesy of Workroom Tech. Link at end of blog.
Close up of the clamping system holding fabric in place.
Before fabric is on the table, I mark out the finished width and length of roman shades with blue tape. The pins indicate where the rows of rings will be.
Step 6. Sewing & Stitching
For almost every item, I work bottom to top. The bottom hem is the first place to begin followed by the side seams. Hems are either hand sewn or machine stitched depending on the item or fabric content. The top is finished last and where I check for correct finished length. If a banding, braided trim, or other type of trim is to be included, they are also either hand or machine sewn in place, usually before the hems.
Step 7. Folding
Once an item has been completed and the finished length and width has been checked, I’ll raise Roman shades to the “up” position and flat fold or fan fold pleated panels. This helps eliminate wrinkles during transportation and helps train the fabric to look good in both open and closed positions. For linen fabrics, I flat fold to eliminate sharp creases.
Finished panels and shades folded in place to train the fabric before packaging and delivery.
Shades folded and packaged, panels will be packaged just before delivery to avoid wrinkling.
Step 8. Packaging with Love
To keep all window treatments in pristine condition until installation, they are packaged in plastic bagging which I reuse as many times as possible.. This protects them during transportation and handling. All packages are labeled along with parts or hardware needed.
Step 9. Delivery and Installation
Final step: delivery and installation! I personally deliver the window treatments, assist my great team of installers, and stay until everything has been completed. Since I love the big reveal, I prefer that clients are not in the room until all has been installed. The last thing I do before leaving is go over the care and operation instructions with the clients.
There are instances when designers pick up their window treatments directly from my studio. In those circumstances, I include detailed installation, care and operation instructions.
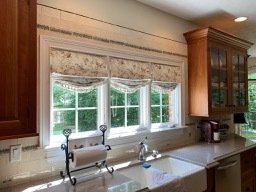
The photos below show treatments I made for a beautiful French Country kitchen. After shades were installed, I went over the operating instructions with the homeowner and care instructions for the fabric.
Functioning relaxed romans in an aviary toile fabric for a French Country Kitchen.
Stationary drapery panels for a breakfast nook in a French Country Kitchen.
close up of the tassel fringe on the lead edge of the panels.
What would your most beautiful home look like?
I put the same amount of care into each order as I would if it were for my own home. I know how important it is that a piece fits the decor, fills privacy needs, and works properly. The best part of my job is creating things people enjoy.
Custom window treatments make a huge difference in how people view and live in their space and are worth the investment. Even better, they last!
Ready for custom window treatments that will make you fall in love with your home again? I'm here to help. Contact me to start your consultation.
Until next time,
Laura
Clamping system photos courtesy of Workroom Tech.


